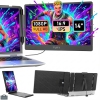
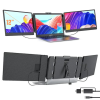
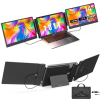
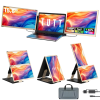
TUTT S3 14” Dual Portable Laptop Monitor | IPS Full HD | Built-in Stand & Speakers | All Devices Compatible
Key Features
•Dual 14” FHD IPS Displays: 1920×1080 resolution with 300-nit brightness for sharp, consistent visuals
•Portable Folding Design: Ultra-slim and weighs only 3.57 lbs—perfect for hybrid professionals and travelers
•Built-in Stand: Integrated kickstand ensures stable positioning at various angles
•Plug and Play: No drivers required; connect via USB-C, USB-A, or HDMI
•Multiple Display Modes: Mirror, Extend, Portrait mode for custom workflows
•Wide Compatibility: Works with Windows, macOS (including M1/M2/M3), Android, Linux, ChromeOS, and gaming consoles
•Built-in Stereo Speakers: Clear audio for presentations, streaming, and video calls
Technical Specifications
•Screen Size: 14” × 2 (dual monitors)
•Resolution: 1920 × 1080 (Full HD)
•Panel: IPS Anti-Glare
•Brightness: 300 nits
•Aspect Ratio: 16:9
•Refresh Rate: 60Hz
•Rotation Angle: 180°
•Audio: 2 × built-in stereo speakers
•Compatible Laptop Sizes: 13” – 16.8”
•Connectivity: USB-C to USB-C, USB-A to USB-C, HDMI to Type-C
•Weight: 3.57 lbs
What’s in the Box
•1 × TUTT S3 Portable Monitor Extender
•2 × USB-A to USB-C Cables
•2 × USB-C to USB-C Cables
•1 × HDMI to Type-C Cable
•1 × Carrying Bag
•1 × H5 2-in-1 Video Transmission Cable (for MacBook M1/M2/M3)
•2 × User Guides
Designed for Productivity on the Go
Use the TUTT S3 as a dual screen monitor with Mac or Windows laptops. Expand workspace while traveling, presenting, or collaborating. Ideal for multitaskers, professionals, and remote teams needing a reliable second screen for laptop.
Whether you’re reviewing spreadsheets or editing media, this folding portable screen adds performance without compromising portability.
Real-Time Setup Support
Every TUTT monitor includes access to fast technical support. Simply:
•Follow instructions on the package.
A certified technician will contact you within 90 minutes to walk you through setup and compatibility.
————-
How to Connect:
Compatible Models: TUTT S3 | S6 | F3 | S2 Mini – Dual Screen Portable Monitors
Connection instructions vary depending on your laptop’s available ports. Please review the options below:
1. HDMI + Full-Featured USB-C (Thunderbolt)
Recommended Setup for Best Performance
First Screen
•Connect a full-featured USB-C cable directly from your laptop to the USB-C port on the first screen.
•No external power is required.
Second Screen
•Connect HDMI from your laptop to the HDMI/DP (typically red-marked) port on the second screen.
•Use a USB-C cable to supply power to the second screen.
Note: While the second screen may receive power from the laptop, external power is strongly recommended for stable performance.
————————————————————-
2. HDMI + Regular USB-C or USB-A
When Your Laptop Does Not Support Thunderbolt USB-C
First Screen
•Connect HDMI from your laptop to the HDMI/DP (typically red-marked) port on the screen.
•Power the screen using a USB-C cable connected to an external power source (recommended).
Powering from laptop is possible but not advised for long sessions.
Second Screen
•Connect the included H5 conversion cable (USB-C + USB-A heads) to your laptop.
•Connect the USB-C end of the H5 cable to the HDMI/DP (red) port on the second screen.
•Use an external USB-C cable to power the second screen.
•A blue screen with connection icons should appear.
•Locate and install the “Display” driver on your laptop.
– If no display appears, restart your system after driver installation.
————————————————————-
3. MacBooks with One Full-Featured USB-C + One Regular USB-C
For Mac M1, M2, M3 Series and Newer Models
First Screen
•Connect a full-featured USB-C cable directly to the first screen.
•No external power required.
Second Screen
•Connect the included H5 conversion cable (USB-C + USB-A heads) to your MacBook.
•Plug the USB-C end of the H5 cable into the HDMI/DP (red) port on the second screen.
•Power the screen using a separate USB-C cable connected to an external power source.
•A blue connection screen should appear.
•Locate and install the “Display” driver on your Mac.
– Restart your Mac if the second screen doesn’t activate immediately